These units are real high quality headlights build after todays high
standards, utilizing the latest FF (free form) reflector design technologies.
These units are NOT just another set of aftermarked fog light that has been
thrown into a headlight application. They were solidly designed for racing and
has proven to last. Several LeMans track cars uses them with good results. Also
rally cars (Subaru) have been spotted using them. Whats good enugh in
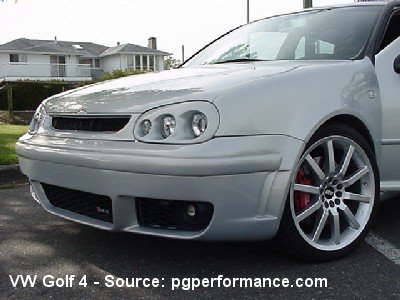
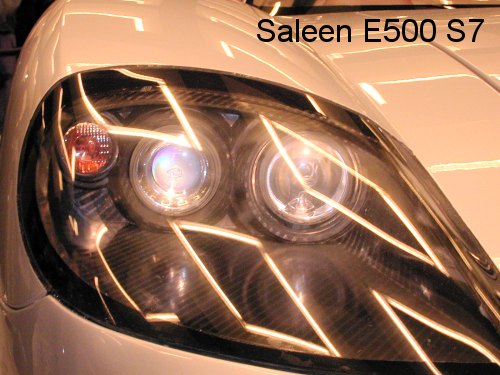
professional racing is good enough for street use. Below is some pictures of
cars they have been used on:
Ford Focus (aftermarked)
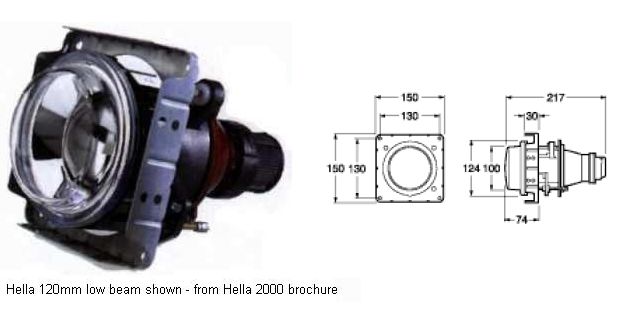
120mm units:
Option:
Bulb:
Labeled:
Beam:
Included:
Release date
Price per unit
P/N
From (Also see text below)
H1
E1
-
summer 2001
US$ 108
Susquehanna.com OR any European Hella dealer (lower price)
D2S
E1
-
D2/Hella ballast for 24V
--- " ---
?
1BL 007 834-037
--- " ---
Matching high beam modules are also available.
90mm units:
Low beam is advertised or has been for sale in these versions:
HID equipment:OEM D2S bulb, Ballast, relays, harness and plugs.
Options 2, 4 and 6 cannot be bought without HID equipment.
Options 2, 4 and 6 will have OEM quality HID. Retrofitting HID into options
1, 3 or 5 is not legal and will never reach same quality.
If you do not already have HID equipment, (4) and (6) gives you the best beam
pattern for a little more money.
What is the most powerful low beam unit?
(Sorted starting with the best)
Option (4) Untested - will probably give the most balanced pattern and with
high brightness - only street legal under ECE.
Option (6) Untested - only street legal under DOT.
Option (5) retrofitted with a Philips OEM D2S bulb that will work well with
some enhancements described below, it will create this beam.
Beam is wide without compromising down the illumination, with soft transisions.
The right flare is relatively high but the illumination is a good compromise
between increased right side vision and acceptable glare levels. Price will end
up on USD400-600, all depending on how good you are to shop around. This choice
is not street legal under ECE nor DOT.
Option (3) retrofitted with Philips OEM D2S bulb and enhancements as
described below. This unit is switchable between LHD and RHD by turning the
projector unit 15 degrees, which means that it is symmetrical - illumitation
levels follow the same pattern from the "kick" in the cutoff line towards each
side. Which in turn means that total output lacks a little because the overly
illuminated right flare has to be covered up. Illumination in front of the car
is higher than desired, but toleratable. Illumination down the road and outside
the horisontal 40 degree opening angle is just average. Transistions are a
little rough, but toleratable. Glare levels are acceptably low. This choice is
not street legal under ECE nor DOT.
Option (5) which is pretty powerful as it is. It has a 65W bulb which is 10W
more than almost any other low beam halogen application. Only street legal under
DOT.
Option (3) - only comes with a 55W halogen and is less powerful than (5).
Only street legal under ECE.
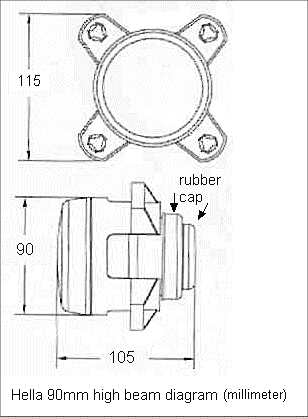
High beam units
High beam modules have a modern FF reflector with no curved lens -
this is not a projector. They have the same diameter in front, same mounting
mechanism, and same back
plate as low beam modules with same bulb. Outside finish is heat painted
magnesium with real glass in front. ECE versions can be ordered with a 5W city light
bulb in the bottom portion of reflector, which should always be lit up in
case low beam bulbs breaks or you are parked on the curb. Pricing is similar to
low beam modules. There are 2 differnt Halogen versions (ECE and DOT) and 2
different HID versions (ECE and DOT) out there. Halogen ECE has this beam pattern, at 20ft with a 55W halogen. Its a typical ECE
high beam and from eyes that are used to DOT high beam, it will look spotty with
a 30 degree opening angle, but herman likes them - great for high speed driving!
All of them are totally symmetrical between right and left side, so they will
work well in both RHD and LHD applications.
HID high beam version is not really recommended for primary high beams
because of warmup time. As auxillary light it is a total different story.
Because of the small size, several units can be mounted side by side and give
enough light for rally usage!
What is the difference between parts from Hella USA and Hella
Germany?
Hella USA parts listed on http://www.hellausa.com/ with 7 digit P/N can be bought (read
special ordered) from any local North American Hella dealer. Hella germany
(euro) parts listed on http://www.hella.de/ with 12 digit P/N are only available
through European retailers and gray importers in North America. Puma in Ohio is
one of them.
Most of Hellas parts are manufactured in Germany, regardless of its
destination marked.
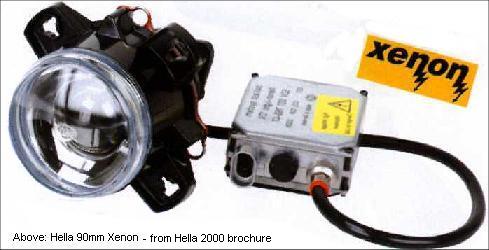
What is the difference between Hella 90mm Xenon low beams and other OEM HID
projectors?
All Hella 90mm low beam units are very small - hight of the
active reflector is only around 55 mm. They can be compared to 1999-2002 Audi A4
Xenon Euro (made by Valeo) and 2001-2003 VW Golf Xenon Euro (made by Bosch),
both sizewise and output. Hella 90mm does not fall behind in performance, not
even as HID retrofitted halogen version. (For more details on on OEM HID units -
see OEM HID DB)
The main difference here is the design approach. Hella 90mm Xenon is a
mechanically more solid and weatherwise a complete unit. The A4 unit (as well as
all other OEM projectors) is more frigile because it is removed from the
protecting headlight assembly that it came in from the factory. The entire
reflector of the Hella 90mm is made out of thick magnesium, the reflector of
A4/Golf unit is thin plastic. Hella 90mm cutoff shield is a little outside
focus, which softens up the cutoff line and reduces the blue color band right
below cutoff line. Very minor traces of yellow, orange and red are visible
instead. Also the 90mm front glass lens has a slight curve to it and reduces
colours in the cutoff band
What is the difference between option (5) and (6) above?
The dual light
source (H9/D2S) labeling on the front glass made several of us wondering a long
time if Hella actually used the excact same optical parts, and just replaced
back plate so that it accepts the 2mm shorter D2S bulb. But a closer inspection
have showed that the optical surfaces of the projector are different. The
variance is not easily seen by a naked eye. The H9 unit has a slight cutout
of where a D2S wire should go through reflector, just like OEM HID projectors
have. The 90mm unit, in general, is designed for a high output light source
(e.g., the H9 bulb). The beam pattern is reportedly DOT-compliant ("harmonized
beam") with the H9 bulb at 1870 lm (at 12.8V) - in terms of light output at the
various test points decreed by existing US regulations. Actual bulb lumen output
on the highway at say, 14.0V would be 136% of 1870 lm, or 2543 lm. A D2S
capsule, with 3200 lm output, only produces 26% more lm than the H9, at highway
voltage, so optics would not be oversaturated, which can typically happen when
original light source is much weaker than an HID bulb.
What variations has been seen on option 5?
At release time, curved lens
was clear. Later on, some models have been clear, others have been ribbed, with
a fresnel like pattern on it. Clear lenses has slightly more down the road
illumination and sharper cutoff line. The ribbed curved lens bleeds a little
more light above cutoff and gives slightly more even spread of light. The
differences are not big enough to spend time and money and go hunting for clear
lenses.
What units can take overwattage bulbs?
Halogen low beams: Caution must
be taken, mostly because of the front
shell that are made out of ABS plastic. H7 units might be able to take 70W
bulbs, if voltage levels are kept less than maybe 13volts. Considering that
option (5) can take 65W with the same front shell, this COULD be possible. A
small 12V computer fan can be inserted to cool down the rear of unit for
increased safety. None of this tested - so you are totally on your own!.
Halogen high beams: Since housing is magnesium and glass, it will not melt by
upgrading to any higher wattage bulb. Just make shure connector terminals are of
high quality and mounting bracket can take the added heat.
What are the measurements on H7 E-code low beam:
P/N 1BL 008 193 00
Front glass lens: 87 mm diameter biggest witdh: 115 mm bigest hight:
113mm Depth: 140 mm + depth of HID socket, which is 25mm. Totals to 165mm or
6.5 inches. Curved lens diameter: 50mm (Inside the unit)
What are the measurements on H7 E-code high beam:
P/N 1KO 008 191 00 -
(included 5W intergrated City light bulb) Front glass lens: 87 mm diameter
biggest witdh: 118 mm biggest hight (w/ city lights): 122mm + length of
city light AMP connector (not needed) biggest hight (w/o city lights): 118mm
Depth (from front glass to rear end of rubber boot): 151mm
What about sizes on the other versions?
They have the same dimensions,
the H7 low beam projector is the deepest halogen projector.
Specifically, depth for option 4 (see above) is 163mm from front glass to
rear end of high voltage plug.
How do I mount this unit?
First of all, there are 4 mounting tabs. There
are 3 mounting/aiming screws included, which means you can cut off one of the
tabs to save space. Rear
mounting example Front
mounting example
Is there any need for extra lens or weather cover?
No. It is a complete
optical unit. With the front
shell screwed on, it is water proof. All units comes with black rubber boot
to cover bulb. Note that HID retrofits does not go inside rubber boots. Both the
rubber boot and unit has tiny air vents to reduce inside condensation. If
are a perfectionist and want to reduce the amount of dirt that can come through
the small 2mm diameter ventilation holes, extend them with a small rubber fuel
hose. The longer distance the less dirt build up.
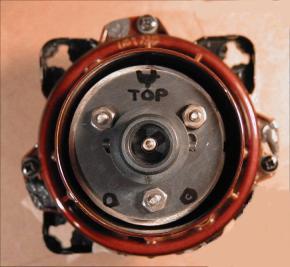
What is up and what is down on the unit?
When you get the unit in your
hands the text on the glass should point down.
Do I have to use the mounting tabs?
No. You can simply cut them off and
glue on your own.
When do I need springs?
Only if you use a rotational spacer (~washer).
This is needed unless you are able to aim the cutoff line straight in other
ways. Unless the cutoff line is 100% streigth, you will annoy yourself to death!
No. The front shell is only
mounted with screws and can easily be removed. The intension of the front shell
is weather proofing, UV reducer, and cosmetic appearance. So if the headlight
box you are mounting it in is weather proof, there is no need for front
shell.
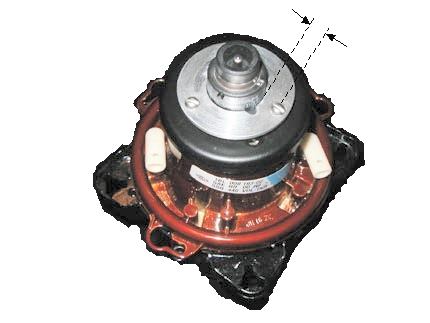
Where can I get spare 4mm Torx screws?
The shield and curved lens are
secured with these screws. Herman looked through a couple of easily accessible
hardware stores in Europe, and found that standard 4mm screws with hex heads are
very easy to find, but they all had incorrect rise ratio. Conclusion: Whatever
you do, take extremily good care of of those screws.!
Where can I buy a H9 HID kit?
If you have not been able to find it, it
is nothing wrong with you or the search engine! Fact is that H9 is a new halogen
base standard in the automotive industry. In Jan 2003, there were no cars that
came with this bulb from OEM. There is no shame to use a P32d based D2S bulb. It
is actually better: Untouched by kit manufacturer and can be bought from any
luxury car dealer, in case you need a spare.
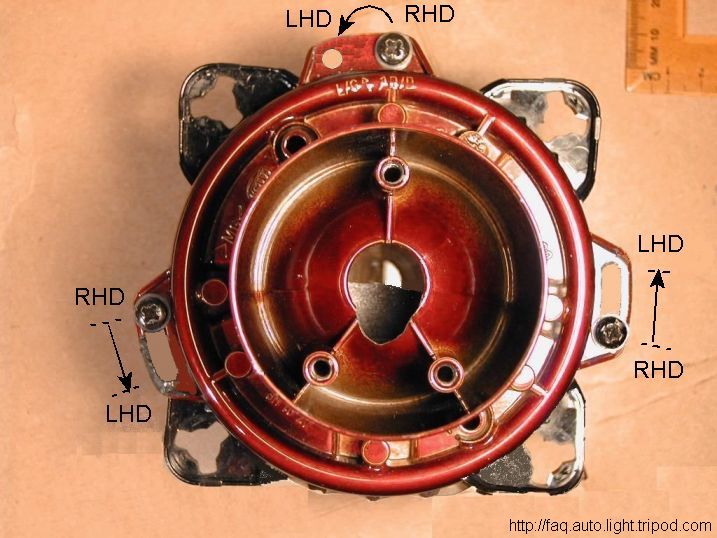
Can any of these units be used for left hand driving?
Yes, they can. For low beam, it is recommend to use option 3, which is
designed for all countries supporting ECE regulations. By turning rear end (red
in color) in relation to front shell (black in color) fifteen degrees, the
desired effect is achieved:
Tweaking:
How do I fit an OEM D2S HID bulb into option 5?
This section will
describe how to modify original backplate. This means that you can never insert
the H9 bulb again. As an alternative, a backplate can relatively easy be
reproduced in aluminum. When you remove
the H9 bulb, there will simply be a hole in the backplate. This hole needs
to be made
bigger. A new bigger diameter of 25mm is fine for the D2S bulb. Some of you
might have noticed that Osram D2S bulbs have a longitunal flange. Philips D2S
bulbs do not have this, so don't create retainer mechanism based on Osram D2S
bulb. If you have not seen the difference, do not start to worry now, the 25mm
hole will support all P32d based D2S bulbs.
Remove the backplate and
store the rest of the projector unit away in a zip lock bag in a different room.
Cut out the 25mm hole using a Dremel "all purpose cutting" bit. It will decrease
the life of the bit when cutting in magnesium compared to usage in plastic, so
have a couple of spares handy. Carefuly place D2S bulb into hole, so that it
rests on the backplate. Note how easily it slides in all directions. This can be
overcome by drilling 3 symmetrical holes for 6-32 x 1/2 inch (3mm diameter)
bolts in the backplate. When you mount the bolts in from reflector side, they
should all be at the edge of the bulb, around 120 degrees apart. This way D2S
bulb will not slide sideways. So far so good. Now you will see that bulb still
can rotate and fall out back words. Here comes the remedy for that: The bulb
needs to be squeezed against backplate using a bulb
retainer. Thread it past the onto the D2S bulb, past the 2 plastic tabs. A
bulb retainer like this can easily be made out of 2mm aluminum (same as
suggested in option 3). Attach small nuts, and tighten. They should be tighten
so hard that bulb will not rotate while you attach the huge high voltage
connector. Glue the 3 bolt heads to backplate with JBWeld (see tools and
materials page) to make it easier bulb replacements. Picture below shows bolts
mounted the opposite way. Picture also shows that bolts are placed away from the
edge of bulb, which is good if you want to experiment with bulb placement. It is
not that good for normal install. It is easy to overtighten bolts and bend bulb
retainer. Unless you select thicker than 2mm bulb retainer which in turn will
increase weight. There has been alot of discussion whether or not to mount bulb should be
centered in this fixture. The direction I am referring to here is below center.
Excactly how many millmeters below center to get the most optimized results is
currently unknown. As a rule of thumb, you can select 1mm. Keep it within the
range 0-2mm. The H9 version has a weatherpoof bulb, so a big rubber grommet
is not included. Those rubber grommets are not available as spares from Hella.
It might be possible to use rubber grommets from older style H4 lamps. In
example sealed beams with H4 bulbs. More details on custom weatherproofing
is described under Herman's custom headlight units on this faq.
How do I fit an H7 HID kit into option 3?
The H7 bulb is thin, so
reflector hole diameter is only 16mm, compared to 25mm used on OEM HID
headlamps. An HID bulb will go in there, but the risk of hurting the ceramic
insulation on return wire while inserting bulb is high. Another very imoprtant
factor is that return wire
needs 5mm spacing around it. This means it will need a deep
groove (6-7mm), to made in the reflector. Failure to do so can result in cracked
insulation on return wire of bulb. Remove the backplate before starting to
cut. This will make it easier to cut. Herman recommends stuffing a tennis
sock retained by paint tape into reflector so that less amount of cutoffs come
in contact with reflector and possibly scratching it. Also keep in mind to not
touch the sock with the dremel cutting bit. 35000 RPM sock can be pretty
exciting experience!
How do I fit a OEM D2S HID bulb into option 3?
Make the groove in
the reflector as described above. Store away the H7
backplate, but keep the 3 retaining screws. It should then look like this.
Then get some aluminum or magnesium in 4 and 2mm thickness. Drill out 2 rings
using hole saws or get help from a machine shop. For simplicity, the inner hole
on both plates should be centered during drilling. Result should look like this
after fabrication. If you make these rings at home, its hard to make this
down to 0.5mm tolerances, which is required. To make it simpler for yourself,
wait with alignment of bulb until the end. In fact, the alignment here means to
insert D2S bulb, then drill out exact holes for screws that will hold the bulb
retainer. The bulb have to sit in
the middle horisontally, and then vertically moved down 1.5mm from center.
The 3 screws will hinder the bulb from sliding sideways. Then drill out the
holes for screws in bulb retainer. All that remains now is to use the included
rubber boot to protect the D2S bulb connector against weather. Carefully cut out
a 32mm hole. 2 weeks after install and when evrything works, you can seal it up
with a tiny bit of high temp silicone. In case bulb breaks, silicone is
relatively easy to remove mechanically.
Above: Philips
D2S secured with bulb retainer and 3 6-32 x 1/2 inch (3 x 12mm) stainless steel
screws to new backplate
Will the 5mm cutout for return wire reduce output?
No, tests have shown that even covering up the entire bottom half reflector
has minimal to no impact.
This sounds complicated, what else can you suggest?
This may seem
like alot of effort to get the bulb secured, but other solutions will not
be as safe. HID bulbs are dangerous if used incorrect. There is quite a lot of
force needed to lock a connector to the D2S bulb, and the risk that bulb goes
out of focal point or even worse: breaks loose. Here is few ways that is NOT
recommended:
Use of a locking ring. Simply cut out a ring from 1 - 2mm stainless steel or
aluminum that you place on top of the bulb. Drill holes in the rear of the
housing, and in the tab of the rings. The 2 cutouts on the inside of the ring
are for the D2S bulbs 2 tabs. If you use inside diameter 26mm instead of 25mm,
you might get away with just one cutout. By angling the ring, you should be able
to get it over the bulb. See drawing.
Again, I will not recommend this one. It does not allow final
vertical/horisontal adjustment. And it is way too frigile.
Use of a ring from a key chain and bending it to fit into stock retainers,
or retaining them into new holes. Again a risky solution.
Glue the D2S with JB Weld or similar directly to Hella base plate. Not
recommended. Very unpractical. Fumes from glue will most likely fog up reflector
and possibly the glass on HID bulb.
What changes are needed to make the H7 Hella 90mm optically ready for
HID?
Intensity levels right under the cutoff line around the center of the beam is
the same. This unit is designed to have a large right* road shoulder flare. This
is fine as long as a 1500lm H7 bulb is used as light source. But a D2S bulb with
over double the intensity will send way too much light onto right* shoulder side
of the road. At an intersection, any vehicle, even bus coming from the right*
will exeperience major glaring. From the driver seat, there is so much light up
in the roadside trees and buildings that it becomes annoying.
The bandaid is to cover up the flare. The extra cover can simply be made out
of thin aluminum foil from a sanded pop can. Adehiesive is Black high temp
(600F) sensor safe silcone gasket maker. Aluminum can be left alone, but will
get a thin layer of oxidation wich will make cutoff line look bumpy, so Herman
recommends painting it. Use hight temp paint (see Tools and materials page).
Cutoff edge must be extremely straight - it will be projected down the road. Any
irregularities will be visible. Accuracy of 1/20 of a millimeter is neccesary.
Which more or less means that you sand after the trial and eror method.
Using the above shown shield, this
is how it looks like using the E-code version with the stock 55W Halogen bulb,
at a distance of 20ft (6 meters). Please overlook the clothing hanger (in the
middle left), the tap (in the middle), and the black vertical air vent pipe.
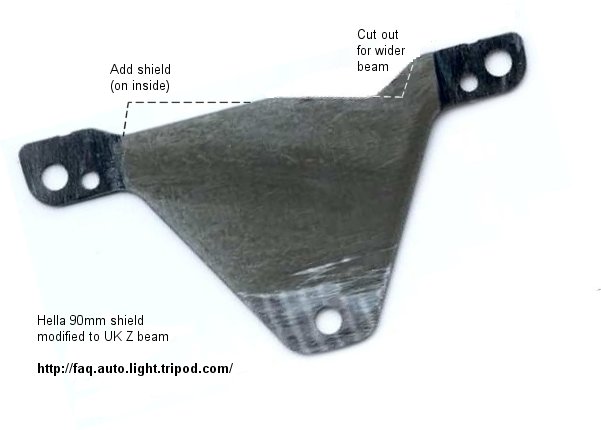
How do I make the shield ready for HID for UK usage?
The following
picture is a theoretical study, not tested in real life:
How can I separate the front shell?
The front
shell consist of a clear real glass which is glued to an ABS cylinder:
Unfortunately the glue that holds the front glass is not hot melt. What I did
was to carefully cut the black plastic around the glass and use a blade and cut
the gray silicone stuff. You still have to use a screw driver to slowly work
your way around the glass to pry it off. Don't use too small a screwdriver since
that will chip the glass quite easily. And be careful when you cut the black
plastic. You have to be really patient to do the job. I think it took me about
60-90 minutes to do one... [wewong]
Surrounded by my vaunted arsenal of light building materials, I went to work.
Oh there were many tools alright! 7 different screwdrivers alone... A man can
build a spaceship with that kind of support. You could say I was armed to the
teeth. LOL. What I thought was gonna be a challange wasn't one at all... The
lenses came off in little over 30 minutes of work!! A little disappointed that
it was a little too easy, I even started talking smack to the lights...
Hahahahah... "That's all you got? Man, and here I expected more than that..."
LOL... Eric's method worked great. What is needed is to cut the housing, using a
dremel cut-off disc, along its circumference about 2-3mm in to the bottom of the
ledge where the lenses sit at. Once you do this, you simply pull the thin
plastic strip that is formed. You will then use a thin screwdriver to further
break down the adhesive and finally use a thin straight screwdriver to pry the
leses off. The lenses have your typical "hard outter shell" defense. It seems
that they are impossible to take off. But once you are able to put the straight
screwdriver underneath the lense, it is pretty much all over. The adhesive gives
way in lighting speed after that. After the lenses were removed I used a dremel
sanding drum to clean off the ugly gray adheasive and make it nice and black all
around. Timewise, I used 5-10 min on each. [Milan]
How hot does the modules get?
This picture shows temperatures across the low beam E-code
unit at 24C ambient (room) temperature with a 55W bulb. An HID bulb has less
wattage, but housing doesnt feel any cooler. There will always be losses, and
they will certainly be 3 times as high, which probably explains the eqvivalent
tempratures. When mounted inside a headlight, temperatures will be higher.
Add 10-15C for that. Also add another 15C, because of possible higher ambient
temperatures. This will corresspond to 40C, which is a really hot day.
This picture shows temperature readings for E-code high beam.
Can you show some examples of projects where Hella modules have been
used?
Any front turn light from car will
do. Just note that the closer it is mounted to the low beam, the more output is
needed. Hella has a small turnlight that fit the tightest space. It is used in
the "Hella triple round". Hella P/N for this turnlight is 2BA 008 221-001.
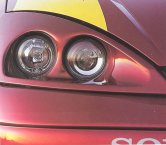 Ford Focus (aftermarked)
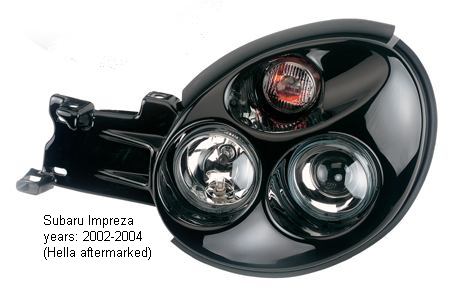


 High beam modules have a modern FF reflector with no curved lens -
this is not a projector. They have the same diameter in front, same mounting
mechanism, and same back
plate as low beam modules with same bulb. Outside finish is heat painted
magnesium with real glass in front. ECE versions can be ordered with a 5W city light
bulb in the bottom portion of reflector, which should always be lit up in
case low beam bulbs breaks or you are parked on the curb. Pricing is similar to
low beam modules. There are 2 differnt Halogen versions (ECE and DOT) and 2
different HID versions (ECE and DOT) out there. Halogen ECE has this beam pattern, at 20ft with a 55W halogen. Its a typical ECE
high beam and from eyes that are used to DOT high beam, it will look spotty with
a 30 degree opening angle, but herman likes them - great for high speed driving!
High beam modules have a modern FF reflector with no curved lens -
this is not a projector. They have the same diameter in front, same mounting
mechanism, and same back
plate as low beam modules with same bulb. Outside finish is heat painted
magnesium with real glass in front. ECE versions can be ordered with a 5W city light
bulb in the bottom portion of reflector, which should always be lit up in
case low beam bulbs breaks or you are parked on the curb. Pricing is similar to
low beam modules. There are 2 differnt Halogen versions (ECE and DOT) and 2
different HID versions (ECE and DOT) out there. Halogen ECE has this beam pattern, at 20ft with a 55W halogen. Its a typical ECE
high beam and from eyes that are used to DOT high beam, it will look spotty with
a 30 degree opening angle, but herman likes them - great for high speed driving!